V-rep (Virtual robot experimentation platform)
V-rep Overview
http://www.coppeliarobotics.com/assets/v-repoverviewpresentation.pdf
V-rep Licenses
http://www.coppeliarobotics.com/assets/v-replicensingoverview.pdf
User Settings:
http://www.coppeliarobotics.com/helpFiles/en/settings.htm
Scene
.ttt
http://www.coppeliarobotics.com/helpFiles/en/scenes.htm
Each scene in V-REP has eight freely configurable pages. Individual pages can be accessed (i.e. displayed) through the page selector toolbar button:
Model
.ttm
http://www.coppeliarobotics.com/helpFiles/en/models.htm
Build clean model
http://www.coppeliarobotics.com/helpFiles/en/buildingAModelTutorial.htm
Shapes:
http://www.coppeliarobotics.com/helpFiles/en/shapes.htm
Object common properties:
Selectable: indicates whether the object can be selected in the scene. Objects can always be selected in the scene hierarchy. Refer also to the simSetObjectProperty function.
Invisible during selection: when enabled, then the object will be invisible for the selection process (i.e. you will be able to select through the object).
Ignored by depth pass: when enabled, then the object will be ignored during the depth rendering pass. The depth rendering pass is used to correctly position the red sphere for camera movements.
Select base of model instead: if enabled, then selecting the object in the scene will select its first parented object marked as object is model base instead (see further down). This property is convenient when protecting a model from faulty manipulations, allowing it to be manipulated as a single entity together with other objects. Refer to the section on models and also to the simSetObjectProperty function.
Don't show as inside model selection: when selected, and the object is part of a model, then the model bounding box (i.e. model selection bounding box) will not encompass that object. This is useful for invisible objects that might make the model bounding box appear too big. This property has no functional effect. Refer also to the simSetObjectProperty function.
Size factor: every object can be scaled (resized) at any time, also during simulation. The size factor will be scaled in a similar way and can be accessed programmatically in order to adjust a code's behavior (e.g. child script). Imagine a 2-wheeled kinematic robot whose movement is controlled in a simple way through a
child script: the child script will calculate the new position of the robot according to several parameters (wheel rotation velocity, wheel diameter and distance between the two wheels). If the user scales the robot, the child script should adjust its calculation according to the new size parameters (wheel diameter and distance between the two wheels). It can do that by using the simGetObjectSizeFactor API function.
Ignored for view-fitting: objects with this item selected will not be taken into account when fitting a scene to a view while no object is selected. Usually floors and similar will be tagged as such. Refer also to the view fitting toolbar button and to the simCameraFitToView api function.
Extension string: a string that describes additional object properties, mainly used by extension plugins (see also the simGetExtensionString API function).
Camera visibility layers: each object in V-REP can be assigned to one or several visibility layers. If there is at least one visibility layer that matches the layer selection dialog layers, then the object will be visible when seen from a camera. By default, a shape is assigned to the first layer, a joint to the second layer, a dummy to the third layer, etc.
Can be seen by: allows to specify a camera or vision sensor (or a collection containing cameras or vision sensors) that will be the only one able to see the object.
Collidable: allows enabling or disabling collision detection capability for the selected collidable object.
Measurable: allows enabling or disabling minimum distance calculation capability for the selected measurable object.
Detectable: allows enabling or disabling proximity sensor detection capability for the selected detectable object. Clicking details allows you to edit the detectable details. Renderable: allows enabling or disabling the vision sensor detection capability for the selected renderable object.
Cuttable: allows enabling or disabling the mill cutting capability for the selected cuttable object.
Object is model base: indicates whether the object should act as the base of a model. An object flagged as base of model has special properties (e.g. saving or copying the object will also automatically save/copy all its children and children's children, etc.). Additionally, when such an object is selected, the selection bounding box is displayed as thick stippled lines, encompassing the whole model. Refer to models, and to the select base of model instead item above.
Edit model properties: allows opening the model dialog. Object / model can transfer or accept DNA: when this feature is enabled for an object or a model, then it will share a same identifier with all of its copies. An Object or model can then transfer its DNA (i.e. copy an instance of itself) to all of its siblings (i.e. objects/models with the same identifier), via the transfer DNA toolbar button. Imagine having 100 same robots in your scene that you want to modify in a similar way: simply modify one of them, select it, then click the transfer DNA toolbar button. This item should almost always be checked for a model base (see further up), to facilitate model re-instanciation.
Main script:
http://www.coppeliarobotics.com/helpFiles/en/mainScript.htmeditor
Child scripts:
http://www.coppeliarobotics.com/helpFiles/en/childScripts.htm
Joints
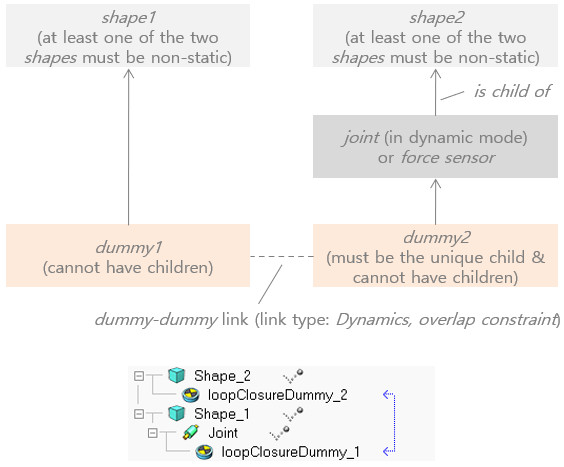
Dynamically enabled joints are joints that are in force or torque mode or that operate in hybrid fashion, and that have a shape as parent object and exactly one child object which must be a non-static shape. In addition, it is possible to involve a joint in a loop closure configuration. In that case the joint has to connect to the two shapes through a dummy-dummy link (where the link type has to be Dynamics, overlap constraint).
Joint properties:
http://www.coppeliarobotics.com/helpFiles/en/jointProperties.htm
Joint dynamic properties:
http://www.coppeliarobotics.com/helpFiles/en/jointDynamicsProperties.htm
Joint control callback functions:
http://www.coppeliarobotics.com/helpFiles/en/jointCtrlCallbackScripts.htm
利用 Python remote API 設定 Joints 變數:
For the simxSetJointPosition function to work, the joint should not be in force/torque mode. If the joint is in force/torque mode, the motor enabled, and the position control enabled, then use the simxSetJointTargetPosition instead. Also make sure the joint is dynamically enabled.
參考程式:
try:
    import vrep
except:
    print ('--------------------------------------------------------------')

import time


def connectVREP():
  vrep.simxFinish(-1) # just in case, close all opened connections
  clientID=vrep.simxStart('127.0.0.1',19999,True,True,5000,5) # Connect to V-REP
  if clientID!=-1:
    print ('Connected Remote Api')
    vrep.simxStartSimulation(clientID,vrep.simx_opmode_oneshot_wait)

    vrep.simxSynchronous(clientID,True)
    return clientID
  else:
    print ('ERROR! Error connecting Remote Api')
    sys.exit(0);

def startSim(clientID):
  vrep.simxStartSimulation(clientID,vrep.simx_opmode_oneshot)

def stopSim(clientID):
  vrep.simxStopSimulation(clientID,vrep.simx_opmode_oneshot_wait)

def disconnectVREP(clientID):
  # Now close the connection to V-REP:
  vrep.simxFinish(clientID)
  print('Connection finished')


clientID=connectVREP()


ret,joint1_handler = vrep.simxGetObjectHandle(\
  clientID,"redundantRob_joint1",vrep.simx_opmode_oneshot_wait)
ret,joint1 = vrep.simxGetJointPosition(\
  clientID,joint1_handler,vrep.simx_opmode_streaming)

ret,joint2_handler = vrep.simxGetObjectHandle(\
  clientID,"redundantRob_joint2",vrep.simx_opmode_oneshot_wait)
ret,joint2 = vrep.simxGetJointPosition(\
  clientID,joint2_handler,vrep.simx_opmode_streaming)

startSim(clientID)

ret,joint1 = vrep.simxGetJointPosition(\
  clientID,joint1_handler,vrep.simx_opmode_buffer)
print joint1  #Get position joint 1
ret,joint2 = vrep.simxGetJointPosition(\
  clientID,joint2_handler,vrep.simx_opmode_buffer)
print joint2 #Get position joint 2

ret = vrep.simxSetJointPosition(\
  clientID,joint1_handler,pi/2,vrep.simx_opmode_oneshot)  #Set pi/2 to joint 1

time.sleep(2)

stopSim(clientID)

time.sleep(1)

disconnectVREP(clientID)
利用 remote API 執行緒程式設定 Joint 變數:
import threading
import time
import sys
import traceback

sys.path.insert(0, 'C:\\Program Files\\V-REP3\\V-REP_PRO_EDU\\programming\\Python')
import vrep

class Joint(threading.Thread):
    def __init__(self, joint_name, port):
        threading.Thread.__init__(self)
        self.client_id = -1
        self.port = port
        self.joint_name = joint_name

    def run(self):
        try:
            # connect to V-REP server
            self.client_id = vrep.simxStart("127.0.0.1", self.port, False, True, 5000, 5)
            if self.client_id == -1:
                raise Exception('Failed to connect V-REP remote API server.')

            # get handle
            res, p = vrep.simxGetObjectHandle(self.client_id, self.joint_name.encode(), vrep.simx_opmode_oneshot_wait)
            if res == vrep.simx_error_noerror:
                print('[Joint %s] handle= %s' % (self.joint_name, p))
            else:
                raise Exception('Error in getting joint handles.')

        except Exception as e:
            print('[Joint %s] %s' % (self.joint_name, e.args[0]))
            traceback.print_exc()

        finally:
            # disconnect with V-REP server
            vrep.simxFinish(self.client_id)

if __name__ == "__main__":
    joints = [Joint("joint1", 19999), Joint("joint2", 19998)]
    for joint in joints:
        joint.start()
        time.sleep(0.1)
    time.sleep(1)
    for joint in joints:
        joint.join()
    print("Done")
Dummy properties:
http://www.coppeliarobotics.com/helpFiles/en/dummyPropertiesDialog.htm
Dummy functions:
http://www.coppeliarobotics.com/helpFiles/en/dummiesDescription.htm
Loop closure:
Dynamic simulations:
http://www.coppeliarobotics.com/helpFiles/en/designingDynamicSimulations.htm#staticAndRespondable
Motion planning:
http://www.coppeliarobotics.com/helpFiles/en/motionPlanningModule.htm
Means of communication:
http://www.coppeliarobotics.com/helpFiles/en/meansOfCommunication.htm
V-rep API
Embedded scripts:
http://www.coppeliarobotics.com/helpFiles/en/scripts.htm
Lua crash course:
http://www.coppeliarobotics.com/helpFiles/en/luaCrashCourse.htm
http://www.lua.org/pil/contents.html
Access objects:
http://www.coppeliarobotics.com/helpFiles/en/accessingGeneralObjects.htm
V-rep API 函式列表:
http://www.coppeliarobotics.com/helpFiles/en/apiFunctionListCategory.htm
V-rep 外部控制方法:
http://www.coppeliarobotics.com/helpFiles/en/externalControllerTutorial.htm
V-rep remote API 範例
根據 http://www.coppeliarobotics.com/helpFiles/en/remoteApiServerSide.htm 中的說明.
V-rep 啟動時, 會根據系統目錄下 remoteApiConnections.txt 檔案中的設定, 啟動 rempte api 功能.
以下為 one-link robot 的 V-rep remote API 程式範例:
import vrep
import sys
# child threaded script:
# 內建使用 port 19997 若要加入其他 port, 在  serve 端程式納入
#simExtRemoteApiStart(19999)

vrep.simxFinish(-1)

clientID = vrep.simxStart('127.0.0.1', 19997, True, True, 5000, 5)

if clientID!= -1:
    print("Connected to remote server")
else:
    print('Connection not successful')
    sys.exit('Could not connect')

errorCode,Revolute_joint_handle=vrep.simxGetObjectHandle(clientID,'Revolute_joint',vrep.simx_opmode_oneshot_wait)

if errorCode == -1:
    print('Can not find left or right motor')
    sys.exit()

errorCode=vrep.simxSetJointTargetVelocity(clientID,Revolute_joint_handle,2, vrep.simx_opmode_oneshot_wait)

while True:
    choice = input("(e to exit, p to pause and enter to exec)>")
    if choice == "e":
        print("exiting")
        vrep.simxStopSimulation(clientID, vrep.simx_opmode_oneshot_wait)
        break
    elif choice == "p":
        vrep.simxPauseSimulation(clientID, vrep.simx_opmode_oneshot_wait)
    else:
        vrep.simxStartSimulation(clientID, vrep.simx_opmode_oneshot_wait)
V-rep Remote API 呼叫模式
http://www.coppeliarobotics.com/helpFiles/en/remoteApiModusOperandi.htm
當 V-rep remote API 需要送出資料讓三軸同動時:
simxPauseCommunication(clientID,1);
simxSetJointPosition(clientID,joint1Handle,joint1Value,simx_opmode_oneshot);
simxSetJointPosition(clientID,joint2Handle,joint2Value,simx_opmode_oneshot);
simxSetJointPosition(clientID,joint3Handle,joint3Value,simx_opmode_oneshot);
simxPauseCommunication(clientID,0);

// Above's 3 joints will be received and set on the V-REP side at the same time
在 V-rep 端設定變數值:
simSetIntegerSignal("mySignalName",42)
之後, 可以從 client 端, 以 remote API streaming 模式取得該變數值:
res,signalValue=simxGetIntegerSignal(clientId,"mySignalName", vrep.simx_opmode_streaming)
當然, 也可以反方向, 從 V-rep 端取得 client 端的變數值.
參考範例:
# Make sure to have the server side running in V-REP:
# in a child script of a V-REP scene, add following command
# to be executed just once, at simulation start:
#
# simExtRemoteApiStart(19999)
#
# then start simulation, and run this program.
#
# IMPORTANT: for each successful call to simxStart, there
# should be a corresponding call to simxFinish at the end!

try:
    import vrep
except:
    print '--------------------------------------------------------------'
    print '"vrep.py" could not be imported. This means very probably that'
    print 'either "vrep.py" or the remoteApi library could not be found.'
    print 'Make sure both are in the same folder as this file,'
    print 'or appropriately adjust the file "vrep.py"'
    print '--------------------------------------------------------------'
    print ''

import time

print ('Program started')
vrep.simxFinish(-1) # just in case, close all opened connections
clientID=vrep.simxStart('127.0.0.1',19999,True,True,5000,5) # Connect to V-REP
if clientID!=-1:
    print ('Connected to remote API server')

    # Now try to retrieve data in a blocking fashion (i.e. a service call):
    res,objs=vrep.simxGetObjects(clientID,vrep.sim_handle_all,vrep.simx_opmode_oneshot_wait)
    if res==vrep.simx_return_ok:
        print ('Number of objects in the scene: ',len(objs))
    else:
        print ('Remote API function call returned with error code: ',res)

    time.sleep(2)

    # Now retrieve streaming data (i.e. in a non-blocking fashion):
    startTime=time.time()
    vrep.simxGetIntegerParameter(clientID,vrep.sim_intparam_mouse_x,vrep.simx_opmode_streaming) # Initialize streaming
    while time.time()-startTime < 5:
        returnCode,data=vrep.simxGetIntegerParameter(clientID,vrep.sim_intparam_mouse_x,vrep.simx_opmode_streaming) # Try to retrieve the streamed data
        if returnCode==vrep.simx_return_ok: # After initialization of streaming, it will take a few ms before the first value arrives, so check the return code
            print ('Mouse position x: ',data) # Mouse position x is actualized when the cursor is over V-REP's window

    # Now send some data to V-REP in a non-blocking fashion:
    vrep.simxAddStatusbarMessage(clientID,'Hello V-REP!',vrep.simx_opmode_oneshot)

    # Before closing the connection to V-REP, make sure that the last command sent out had time to arrive. You can guarantee this with (for example):
    vrep.simxGetPingTime(clientID)

    # Now close the connection to V-REP:
    vrep.simxFinish(clientID)
else:
    print ('Failed connecting to remote API server')
print ('Program ended')
V-rep Remote API 函式列表:
http://www.coppeliarobotics.com/helpFiles/en/remoteApiFunctionListCategory.htm
V-rep 的 remote API 是以 V-rep plugin (動態連結程式庫) 的方式完成, 程式專案位於 programming/v_repExtRemoteApi 目錄中.
V-rep remote API 可以進一步在 embedded script 程式中利用 Lua 程式進行延伸:
myFunctionName=function(inInts,inFloats,inStrings,inBuffer)
    -- inInts, inFloats and inStrings are tables
    -- inBuffer is a string

    -- Perform any type of operation here.

    -- Always return 3 tables and a string, e.g.:
    return {},{},{},''
end
然後利用下列外部的 Python 程式進行呼叫:
inputInts=[1,2,3]
inputFloats=[53.21,17.39]
inputStrings=['Hello','world!']
inputBuffer=bytearray()
inputBuffer.append(78)
inputBuffer.append(42)
res,retInts,retFloats,retStrings,retBuffer=vrep.simxCallScriptFunction(clientID,'objectName',vrep.sim_scripttype_childscript,
                'myFunctionName',inputInts,inputFloats,inputStrings,inputBuffer,vrep.simx_opmode_blocking)
if res==vrep.simx_return_ok:
    print (retInts)
    print (retFloats)
    print (retStrings)
    print (retBuffer)
以 remote API 取 camera 影像
from PIL import Image
import array

res, v0 = vrep.simxGetObjectHandle(clientID,'NAO_vision1',vrep.simx_opmode_oneshot_wait)

res, resolution, image = vrep.simxGetVisionSensorImage(clientID,v0,0,vrep.simx_opmode_streaming)

image_byte_array = array.array('b',image)
# image resolution is 256x144
im = Image.frombuffer("RGB", (256,144), image_byte_array, "raw", "RGB", 0, 1)
im.show()
取影片:
import vrep,time,sys
import matplotlib.pyplot as plt
from PIL import Image
import array

def streamVisionSensor(visionSensorName,clientID,pause=0.0001):
    #Get the handle of the vision sensor
    res1,visionSensorHandle=vrep.simxGetObjectHandle(clientID,visionSensorName,vrep.simx_opmode_oneshot_wait)
    print(visionSensorHandle)
    #Get the image
    res2,resolution,image=vrep.simxGetVisionSensorImage(clientID,visionSensorHandle,0,vrep.simx_opmode_streaming)
    print(res2, res1)
    #Allow the display to be refreshed
    plt.ion()
    #Initialiazation of the figure
    time.sleep(0.5)
    res,resolution,image=vrep.simxGetVisionSensorImage(clientID,visionSensorHandle,0,vrep.simx_opmode_buffer)
    im = Image.new("RGB", (resolution[0], resolution[1]), "white")
    #Give a title to the figure
    fig = plt.figure(1)
    fig.canvas.set_window_title(visionSensorName)
    #inverse the picture
    plotimg = plt.imshow(im,origin='lower')
    #Let some time to Vrep in order to let him send the first image, otherwise the loop will start with an empty image and will crash
    time.sleep(1)
    while (vrep.simxGetConnectionId(clientID)!=-1):
        #Get the image of the vision sensor
        res,resolution,image=vrep.simxGetVisionSensorImage(clientID,visionSensorHandle,0,vrep.simx_opmode_buffer)
        #Transform the image so it can be displayed using pyplot
        image_byte_array = array.array('b',image)
        im = Image.frombuffer("RGB", (resolution[0],resolution[1]), image_byte_array, "raw", "RGB", 0, 1)
        #Update the image
        plotimg.set_data(im)
        #Refresh the display
        plt.draw()
        #The mandatory pause ! (or it'll not work)
        plt.pause(pause)
    print('End of Simulation')

if __name__ == '__main__':
    vrep.simxFinish(-1)
    clientID=vrep.simxStart('127.0.0.2',19999,True,True,5000,5)
    if clientID!=-1:
        print('Connected to remote API server')
        streamVisionSensor('NAO_vision1',clientID,0.0001)

    else:
        print('Connection non successful')
        sys.exit('Could not connect')
Execute Complex Commands
# This example illustrates how to execute complex commands from
# a remote API client. You can also use a similar construct for
# commands that are not directly supported by the remote API.
#
# Load the demo scene 'remoteApiCommandServerExample.ttt' in V-REP, then
# start the simulation and run this program.
#
# IMPORTANT: for each successful call to simxStart, there
# should be a corresponding call to simxFinish at the end!
#
# When running Python 3.x, add a 'b' prefix to strings, e.g.:
# 'hello world' becomes b'hello world'

def getCmdString(id,cnt,data):
    l=12+len(data)
    retData=vrep.simxPackInts([id,cnt,l])
    return retData+data

def waitForCmdReply(cnt):
    while True:
        result,string=vrep.simxReadStringStream(clientID,'repliesToRemoteApiClient',vrep.simx_opmode_streaming)
        if result==vrep.simx_return_ok:
            while len(string)!=0:
                headerPacked=string[0:12]
                header=vrep.simxUnpackInts(headerPacked)
                if cnt==header[1]:
                    replyData=''
                    if header[2]>12:
                        replyData=string[12:header[2]]
                    return replyData
                string=string[header[2]:len(string)]
try:
    import vrep
except:
    print ('--------------------------------------------------------------')
    print ('"vrep.py" could not be imported. This means very probably that')
    print ('either "vrep.py" or the remoteApi library could not be found.')
    print ('Make sure both are in the same folder as this file,')
    print ('or appropriately adjust the file "vrep.py"')
    print ('--------------------------------------------------------------')
    print ('')

import ctypes
print ('Program started')
vrep.simxFinish(-1) # just in case, close all opened connections
clientID=vrep.simxStart('127.0.0.1',19999,True,True,5000,5) # Connect to V-REP
if clientID!=-1:
    print ('Connected to remote API server')

    # Commands are send via the string signal 'commandsFromRemoteApiClient'.
    # Commands are simply appended to that string signal
    # Each command is coded in following way:
    # 1. Command ID (integer, 4 chars)
    # 2. Command counter (integer, 4 chars). Simply start with 0 and increment for each command you send
    # 3. Command length (integer, includes the command ID, the command counter, the command length, and the additional data (i.e. command data))
    # 4. Command data (chars, can be of any length, depending on the command)
    #
    # Replies are coded in a same way. An executed command should reply with the same command counter.
    #
    # Above simple protocol is just an example: you could use your own protocol! (but it has to be the same on the V-REP side)

    # 1. First send a command to display a specific message in a dialog box:
    cmdID=1 # this command id means: 'display a text in a message box'
    cmdCnt=0
    cmdData='Hello world!'
    stringToSend=getCmdString(cmdID,cmdCnt,cmdData)
    raw_ubytes = (ctypes.c_ubyte * len(stringToSend)).from_buffer_copy(stringToSend)
    vrep.simxWriteStringStream(clientID,'commandsFromRemoteApiClient',raw_ubytes,vrep.simx_opmode_oneshot)
    print ('Return string: ',waitForCmdReply(cmdCnt)) # display the reply from V-REP (in this case, just a string)

    # 2. Now create a dummy object at coordinate 0.1,0.2,0.3:
    cmdID=2 # this command id means: 'create a dummy at a specific coordinate with a specific name'
    cmdCnt=cmdCnt+1
    cmdData='MyDummyName'+vrep.simxPackFloats([0.1,0.2,0.3])
    stringToSend=getCmdString(cmdID,cmdCnt,cmdData)
    raw_ubytes = (ctypes.c_ubyte * len(stringToSend)).from_buffer_copy(stringToSend)
    vrep.simxWriteStringStream(clientID,'commandsFromRemoteApiClient',raw_ubytes,vrep.simx_opmode_oneshot)
    replyData=waitForCmdReply(cmdCnt)
    print ('Dummy handle: ',vrep.simxUnpackInts(replyData)[0]) # display the reply from V-REP (in this case, the handle of the created dummy)

    # Now close the connection to V-REP:
    vrep.simxFinish(clientID)
else:
    print ('Failed connecting to remote API server')
print ('Program ended')
與上述 Client 端程式配合的 V-rep non-threaded child 程式碼:
if (sim_call_type==sim_childscriptcall_initialization) then
   simExtRemoteApiStart(19999)
end

if (sim_call_type==sim_childscriptcall_actuation) then
   local commands=simGetStringSignal('commandsFromRemoteApiClient') -- Read commands sent from a remote API client
   if commands then
      simClearStringSignal('commandsFromRemoteApiClient') -- Clear the signal
      -- Process the commands in following loop:
      while #commands>0 do
         local cmdID=simUnpackInts(commands,0,1)[1]
         local cmdCounter=simUnpackInts(commands,1,1)[1]
         local cmdLength=simUnpackInts(commands,2,1)[1]
         local cmdData=''
         if cmdLength>12 then
            cmdData=string.sub(commands,13,13+cmdLength-12)
         end
         commands=string.sub(commands,cmdLength+1) -- this contains the next commands

         -- Now process the command, and prepare a reply string signal:
         local reply=''
         if cmdID==1 then
            -- We have to process the command with ID 1, in this example, simply display a dialog box that prints the text stored in cmdData:
            simDisplayDialog('Message from the remote API client',cmdData,sim_dlgstyle_ok,false)
            reply='message was displayed'
         end
         if cmdID==2 then
            -- We have to process the command with ID 2, in this example, create a dummy object at coordinates specified in cmdData:
            local dummyHandle=simCreateDummy(0.05)
            local dummyNameSize=#cmdData-12 -- cmdData should contain the dummy name, plus the x/y/z coordinates
            local position=simUnpackFloats(cmdData,0,0,dummyNameSize)
            if dummyNameSize>0 then
               local errorReportMode=simGetIntegerParameter(sim_intparam_error_report_mode)
               simSetIntegerParameter(sim_intparam_error_report_mode,0) -- temporarily suppress error output (because we are not allowed to have two times the same object name)
               simSetObjectName(dummyHandle,string.sub(cmdData,1,dummyNameSize))
               simSetIntegerParameter(sim_intparam_error_report_mode,errorReportMode) -- restore the original error report mode
            end
            simSetObjectPosition(dummyHandle,-1,position)
            reply=simPackInts({dummyHandle})
         end
         if cmdID==3 then
            -- You can add as many commands as needed
         end

         -- Now, before setting up the reply string, append the cmdID, and a reply length:
         local replyLength=12+#reply
         local replyFromOtherCommands=simGetStringSignal('repliesToRemoteApiClient')
         if not replyFromOtherCommands then
            replyFromOtherCommands=''
         end
         local totalReplySignal=replyFromOtherCommands..simPackInts({cmdID})..simPackInts({cmdCounter})..simPackInts({replyLength})..reply
         simSetStringSignal('repliesToRemoteApiClient',totalReplySignal) -- update the reply signal
      end
   end
end
Qt based custom UIs
http://www.coppeliarobotics.com/helpFiles/en/customUIPlugin.htm
V-rep Tutorials:
http://www.coppeliarobotics.com/helpFiles/en/bubbleRobTutorial.htm
http://www.coppeliarobotics.com/helpFiles/en/buildingAModelTutorial.htm
http://www.coppeliarobotics.com/helpFiles/en/lineFollowingBubbleRobTutorial.htm
Inverse Kinematics Tutorial
http://www.coppeliarobotics.com/helpFiles/en/inverseKinematicsTutorial.htm
http://www.coppeliarobotics.com/helpFiles/en/hexapodTutorial.htm
http://www.coppeliarobotics.com/helpFiles/en/externalControllerTutorial.htm
http://www.coppeliarobotics.com/helpFiles/en/pluginTutorial.htm
http://www.coppeliarobotics.com/helpFiles/en/conveyorBeltTutorial.htm
Compiling V-rep
http://www.coppeliarobotics.com/helpFiles/en/compilingVrep.htm
V-rep Other Interfaces
http://www.coppeliarobotics.com/helpFiles/en/otherInterfaces.htm
Extra contributions:
http://www.coppeliarobotics.com/contributions/